Montoya API
Montoya APIなるものを知った。
お手軽にBurp extensionが書けそうな気配がするので試してみる。
まずはexampleの実行から。
helloworld
READMEにある通り、いろいろ用意してくれている。
まずは Hello World で軽く動作確認してみる。
git clone https://github.com/PortSwigger/burp-extensions-montoya-api-examples.git
cd burp-extensions-montoya-api-examples/helloworld/
ディレクトリ構造は以下の通り。
.
├── build.gradle
├── README.md
└── src
    └── main
        └── java
            └── example
                └── helloworld
                    └── HelloWorld.java

6 directories, 3 files
大事なのは HelloWorld.java だろう。
ソースは以下。かなり単純に書いてくれている。
軽く読んでみると、Output, Error, Eventlogにログ出力した後にRuntimeExceptionを投げている。
では実際にビルドして動かしてみよう。
build.gradle を用意してくれているので、以下コマンドでビルドする。
gradle build
数秒待つと、build/libs/helloworld-1.0.0.jar が生成されるので、これを Burp からロードすることで拡張機能が有効化する。
この時点でOutputに出力されたログが出てくる。
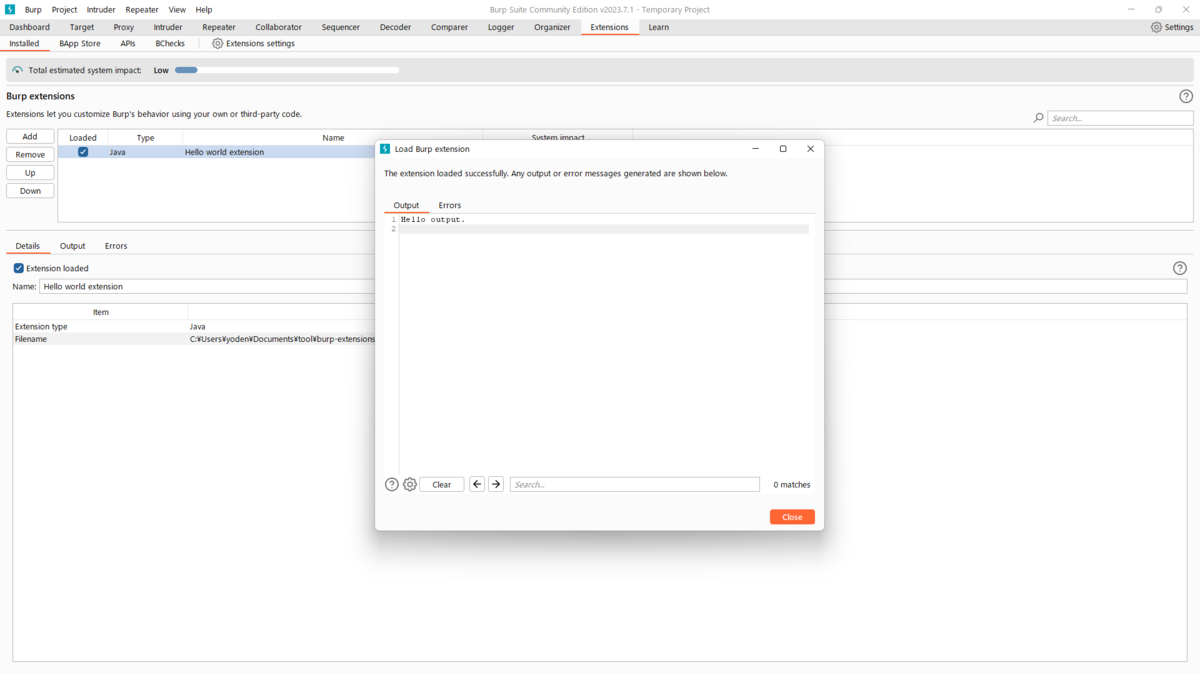
Errors タブに切り替えれば Error に出力されたログとRuntimeExceptionエラーが。

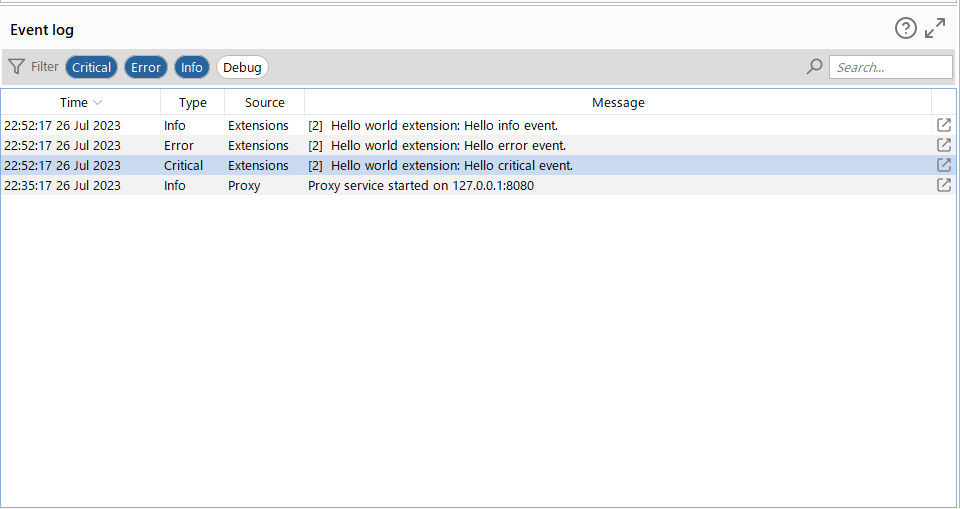
Dashboardタブの Event log では、Type が Info, Error, Critical のログが出力されていることが確認できる。
ということで、一番簡単な拡張機能のコードと動作が確認できた。
固定置換拡張機能
Hello world はログを出力するだけだったので、他の拡張機能やドキュメントを読んだりしながら「リクエスト中の hoge を fua に置換するだけの拡張機能」を作成してみる。( fuga にしなかったのは Content-Length を更新できてるか見たかったから )
javaは書きなれてないが、動けばヨシとする。
Replace.java は main 的な役割として、他ファイルで定義したclassを読み込む形で作成。
package replace;

import burp.api.montoya.BurpExtension;
import burp.api.montoya.MontoyaApi;

public class Replace implements BurpExtension
{
    @Override
    public void initialize(MontoyaApi api)
    {
        api.extension().setName("My Replace extension");

        api.http().registerHttpHandler(new ReplaceHandler(api));
    }
}
ReplaceHandler.java
package replace;

import burp.api.montoya.MontoyaApi;
import burp.api.montoya.http.handler.*;
import burp.api.montoya.http.message.requests.HttpRequest;
import burp.api.montoya.logging.Logging;

import static burp.api.montoya.http.handler.RequestToBeSentAction.continueWith;
import static burp.api.montoya.http.handler.ResponseReceivedAction.continueWith;

class ReplaceHandler implements HttpHandler {
    private final Logging logging;

    public ReplaceHandler(MontoyaApi api) {
        this.logging = api.logging();
    }

    @Override
    public RequestToBeSentAction handleHttpRequestToBeSent(HttpRequestToBeSent requestToBeSent) {
        HttpRequest modifiedRequest = requestToBeSent;

        modifiedRequest = HttpRequest.httpRequest(modifiedRequest.httpService(), modifiedRequest.toString().replace("hoge", "fua"));
        modifiedRequest = modifiedRequest.withBody(modifiedRequest.body().toString()); // update Content-Length

        logging.logToOutput("--------original----------\n" + requestToBeSent.toString());
        logging.logToOutput("--------replace-----------\n" + modifiedRequest.toString());

        return continueWith(modifiedRequest);
    }

    @Override
    public ResponseReceivedAction handleHttpResponseReceived(HttpResponseReceived httpResponseReceived) {
        return continueWith(httpResponseReceived);
    }
}
ビルドしてロードする。
ローカルに適当なサーバを立て、hogeをいっぱい入れてリクエストしてみた。
Output にオリジナルと置換後のリクエストを出力しているので、そこから実行結果が見れる。(loggerから見るのもアリ)
--------original----------
POST /hoge?hoge=hoge HTTP/1.1
Host: localhost:8000
Content-Type: application/x-www-form-urlencoded
Content-Length: 9
hoge: hoge

hoge=hoge
--------replace-----------
POST /fua?fua=fua HTTP/1.1
Host: localhost:8000
Content-Type: application/x-www-form-urlencoded
Content-Length: 7
fua: fua

fua=fua
うまく動いてそうだ。
(このあたりで、ビルドしなおしたときは Extensions タブの Loaded からチェックボックスを一度外して付け直すだけで新しいバージョンがロードされることを知った)
自由置換拡張機能
hoge -> fua はかなり端的に書けた。
これだけだと不便なので、今度はいわゆる needle と replace を Burp の画面から指定できるようにする。
Replace.java の initialize に以下を追加。(Handlerは引数を追加)
        ReplacerTab replacerTab = new ReplacerTab();
        api.http().registerHttpHandler(new ReplaceHandler(api, replacerTab));
        api.userInterface().registerSuiteTab("montoya_replace", replacerTab);
ReplacerTab.java で class を定義。UIのいろいろをここに書く。
ここの入力値をとるために、一応ゲッターも定義。
package replace;

import javax.swing.*;

public class ReplacerTab extends JComponent {
    private JTextField needle;
    private JTextField replace;

    public ReplacerTab() {
        setLayout(new BoxLayout(this, BoxLayout.PAGE_AXIS));

        JPanel customTabContent = new JPanel();

        JLabel needleLabel = new JLabel("needle");
        customTabContent.add(needleLabel);

        this.needle = new JTextField(20);
        customTabContent.add(this.needle);

        JLabel replaceLabel = new JLabel("replace");
        customTabContent.add(replaceLabel);

        this.replace = new JTextField(20);
        customTabContent.add(this.replace);

        add(customTabContent);
    }

    public String getNeedle() {
        return this.needle.getText();
    }

    public String getReplace() {
        return this.replace.getText();
    }
}
そうしたら ReplaceHandler.java でも needle と replace を作成し、replace時にそれらから値をとってくるようにする。
class ReplaceHandler implements HttpHandler {
    private final Logging logging;
    private final ReplacerTab replacerTab;

    public ReplaceHandler(MontoyaApi api, ReplacerTab replacerTab) {
        this.logging = api.logging();
        this.replacerTab = replacerTab;
    }

    @Override
    public RequestToBeSentAction handleHttpRequestToBeSent(HttpRequestToBeSent requestToBeSent) {
        HttpRequest modifiedRequest = requestToBeSent;
        String needle = this.replacerTab.getNeedle();
        String replace = this.replacerTab.getReplace();
        if (!needle.isEmpty()) {
            modifiedRequest = HttpRequest.httpRequest(requestToBeSent.httpService(),
                    requestToBeSent.toString().replace(needle, replace));
            modifiedRequest = modifiedRequest.withBody(modifiedRequest.body().toString()); // update Content-Length

            logging.logToOutput("--------original----------\n" + requestToBeSent.toString());
            logging.logToOutput("--------replace-----------\n" + modifiedRequest.toString());
        }

        return continueWith(modifiedRequest);
    }
  :
完成系は以下。
拡張機能のタブはこんな感じで、needle と replace を指定できるだけ。
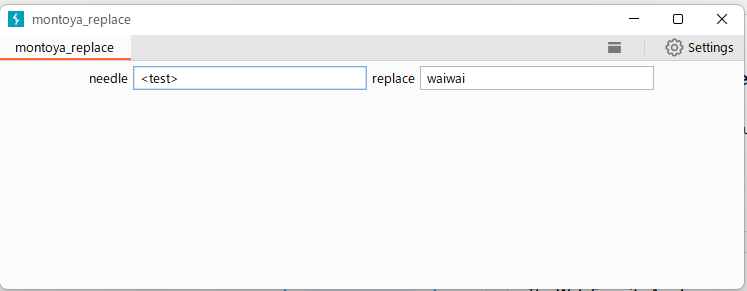
GUIから画像のように指定した時、リクエストに <test> を含めて送信してみると waiwai に置換されていることが確認できる。
--------original----------
GET /?<test> HTTP/1.1
Host: localhost:8000


--------replace-----------
GET /?waiwai HTTP/1.1
Host: localhost:8000
ということで、簡易的なBurpの拡張機能作成を体験してみた。
montoya 以前の拡張機能作成の経験はないが、思ったより作りやすい気がする。